GitHub - happyprogfrog/cache-study: Redis 스터디
Redis 스터디. Contribute to happyprogfrog/cache-study development by creating an account on GitHub.
github.com
GitHub - happyprogfrog/cache-study2: Redis 스터디 2차
Redis 스터디 2차. Contribute to happyprogfrog/cache-study2 development by creating an account on GitHub.
github.com
Cache 실습 - Jedis 사용
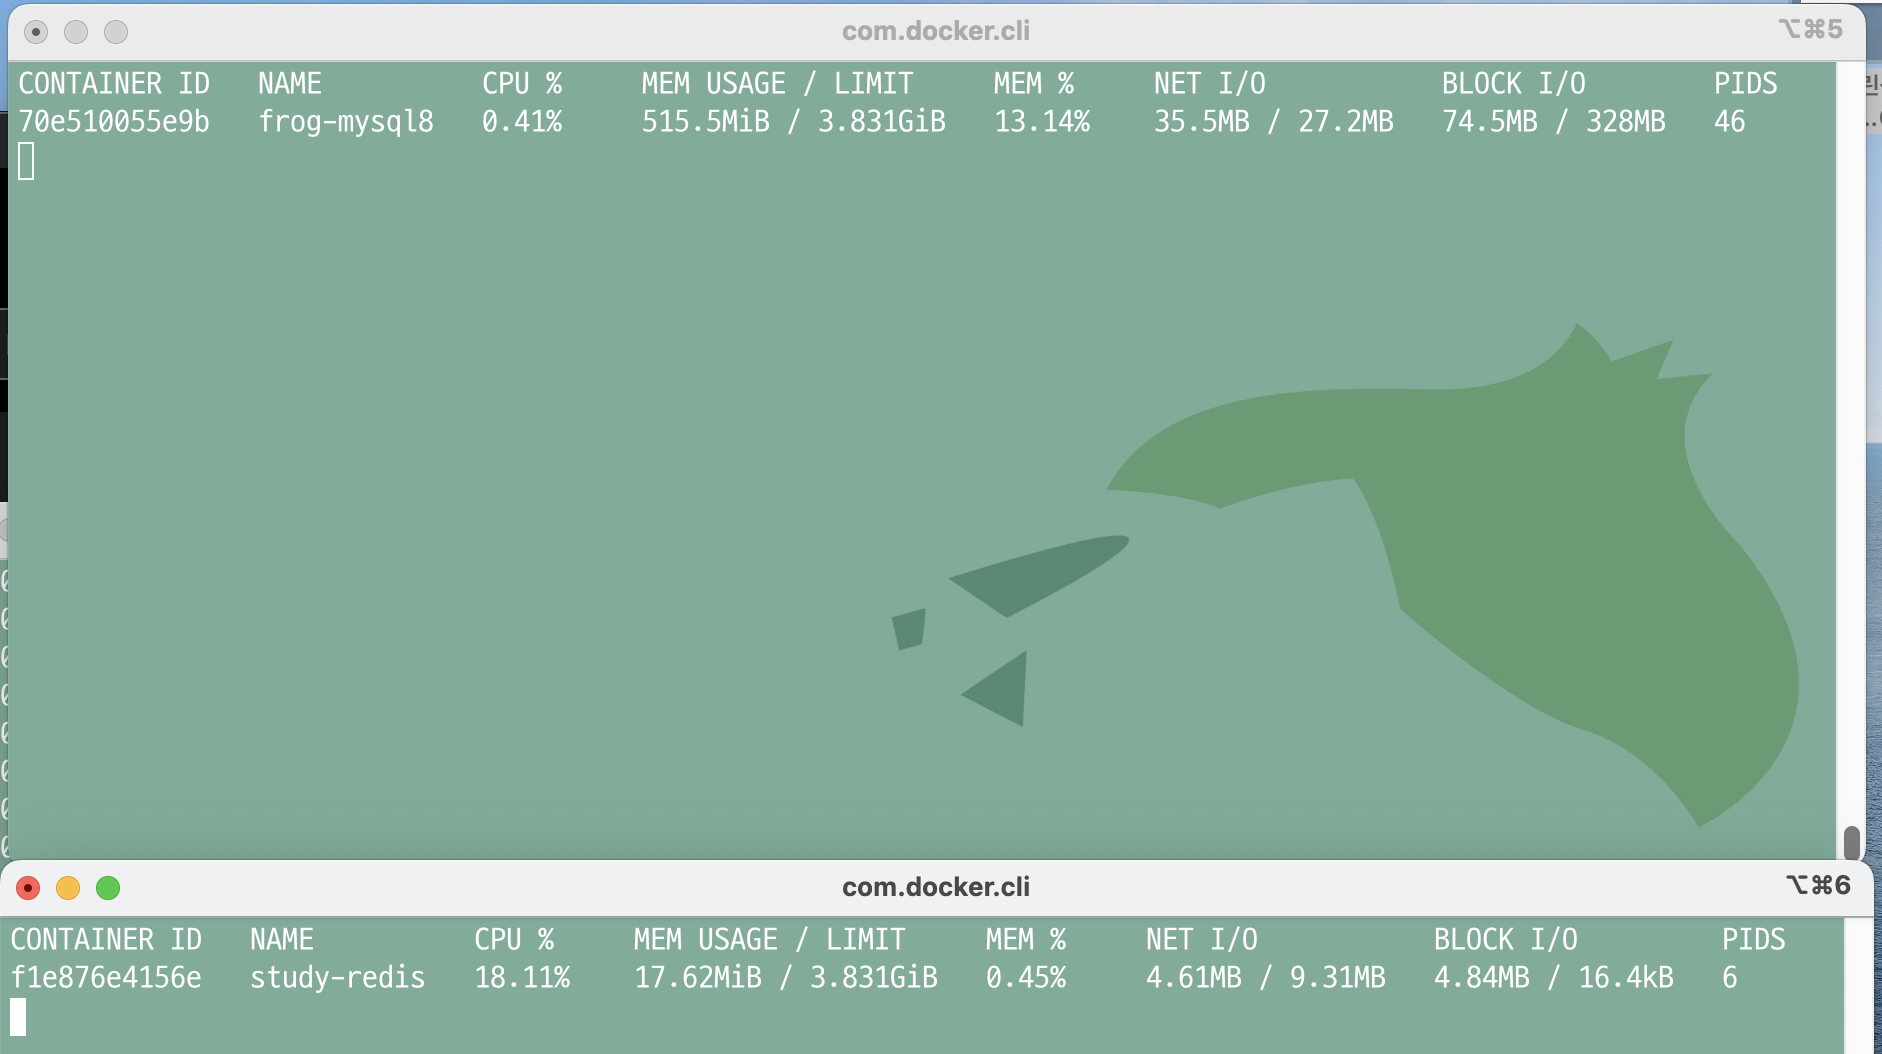
1. MySQL 설정
docker pull mysql:8docker run --name frog-mysql8 -e MYSQL_ROOT_PASSWORD=frog -d -p 3306:3306 mysql:8docker psdocker exec -it frog-mysql8 mysql -p
2. 프로젝트 설정

spring:
  application:
    name: cache-study
  datasource:
    url: jdbc:mysql://localhost:3306/frogsns
    driver-class-name: com.mysql.cj.jdbc.Driver
    username: root
    password: frog
  jpa:
    hibernate.ddl-auto: create
    show-sql: true
3. Jedis 의존성 추가
Jedis guide
Connect your Java application to a Redis database
redis.io
docker run -d -p 6379:6379 --name study-redis redis:6.2package me.progfrog.cache_study;
import org.springframework.context.annotation.Bean;
import org.springframework.context.annotation.Configuration;
import redis.clients.jedis.JedisPool;
@Configuration
public class RedisConfig {
@Bean
public JedisPool createJedisPool() {
return new JedisPool("127.0.0.1", 6379);
}
}
4. 실습 진행
package me.progfrog.cache_study;

import lombok.RequiredArgsConstructor;
import org.springframework.web.bind.annotation.GetMapping;
import org.springframework.web.bind.annotation.PathVariable;
import org.springframework.web.bind.annotation.RestController;
import redis.clients.jedis.Jedis;
import redis.clients.jedis.JedisPool;

@RestController
@RequiredArgsConstructor
public class UserController {

    private final UserRepository userRepository;
    private final JedisPool jedisPool;

    @GetMapping("/users/{id}/email")
    public String getUserEmail(@PathVariable(name = "id") Long id) {
        try (Jedis jedis = jedisPool.getResource()) {
            var userEmailRedisKey = "users:%d:email".formatted(id);

            String userEmail = jedis.get(userEmailRedisKey);
            if (userEmail != null) {
                return userEmail;
            }

            userEmail = userRepository.findById(id).orElse(User.builder().build()).getEmail();
            jedis.set(userEmailRedisKey, userEmail);
            jedis.setex(userEmailRedisKey, 30, userEmail);
            return userEmail;
        }
    }
}

SpringBoot Cache - Spring Data Redis 사용
- thread-safe 한 레디스 클라이언트를 제공
- Spring 프레임워크에서는 Redis 데이터를 다루는 기능에 대해 단순화하고, 추상화된 인터페이스를 제공

Spring Data
Spring 프레임워크에서 다양한 데이터 저장소에 대해서 추상화된 기능, 인터페이스를 제공하는 라이브러리
RDB, NoSQL 데이터베이스에 대해 CRUD와 같이 데이터를 편리하게 다룰 수 있는 기능들을 제공하는 것이 특징
ex) Spring Data JPA, Spring Data Redis, Spring Data MongoDB, ...
Redis Clients
- Lettuce
- Jedis
→ 어떤 것을 사용하더라도, Redis를 다루는 코드는 추상화되어있기 때문에 직접적으로 Lettuce나 Jedis를 다루는 코드를 다룰 필요는 없다.
Why is Lettuce the default Redis client used in Spring Session Redis? · Issue #789 · spring-projects/spring-session
Why Lettuce over Jedis? Is this an arbitrary decision or is there a technical reason behind this decision? Thank you.
github.com
RedisTemplate
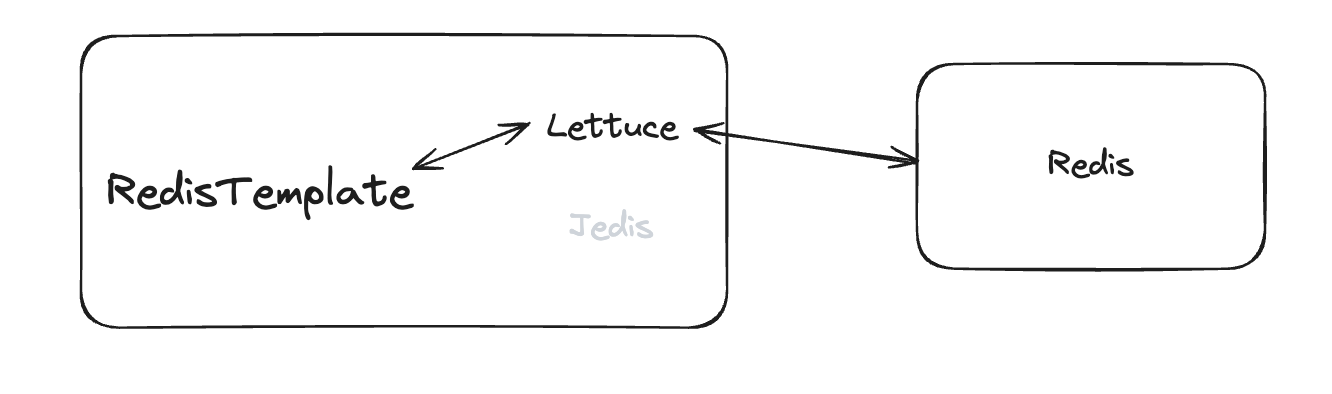
- Spring Data Redis에서 제공하는 Redis Client 객체
- 위의 예제에서는 Jedis를 직접 다뤄서 실습하였는데, 이번에는 Spring 프레임워크에서 제공하는 RedisTemplate을 사용할 예정!
- Redis 데이터베이스와 상호작용하는 여러 기능들에 대해 추상화하여서 간편하게 사용할 수 있도록 도와준다.
- abstraction: 추상화 기능 제공
- connection: 연결 관리
- serializer: 데이터를 저장하고, 가져오는 과정에서 데이터 변환을 처리(직렬화 기능)
implementation 'org.springframework.boot:spring-boot-starter-data-redis'spring:
data:
redis:
host: 127.0.0.1
port: 6379
Redis Repository
import org.springframework.data.annotation.Id;
import org.springframework.data.redis.core.RedisHash;
import org.springframework.data.redis.core.index.Indexed;

@RedisHash(value = "Person", timeToLive = 600)
public class Person {

    @Id
    private String id;

    @Indexed
    private String name;

    private int age;

    // 생성자, getter, setter 생략
}- @RedisHash를 사용하면 Spring Data Redis가 객체를 Redis의 해시 구조로 자동 매핑해준다.
- @Indexed는 Spring Data Redis에서 특정 필드를 인덱스화하도록 지정하는 애노테이션으로, 이 애노테이션을 사용하면 해당 필드가 Redis의 인덱스에 저장되어, 해당 필드로 데이터를 더 빠르게 검색할 수 있다.
- Hash data type ↔ Object
import org.springframework.data.repository.CrudRepository;

public interface PersonRepository extends CrudRepository<Person, String> {
}
SpringBoot Cache - Spring Cache 사용

Spring에서 추상화된 캐시 기능을 제공한다.
Cache Provider를 선택할 수 있으며,
- 로컬 캐시로 활용되기도 하고
- 레디스를 활용하는 캐시로써 동작시킬 수도 있다.
- https://docs.spring.io/spring-boot/reference/io/caching.html#io.caching.provider.simple
implementation 'org.springframework.boot:spring-boot-starter-cache'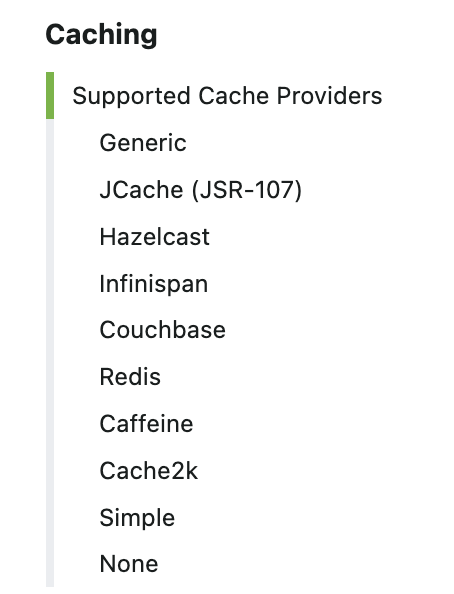


@CacheEvict 애노테이션은, 캐시된 데이터를 삭제하는데 사용된다. 주로 메서드와 함께 사용되며, 메서드 실행 후 특정 조건에 따라 캐시를 무효화하거나 삭제할 수 있다. 이는 캐시 일관성을 유지하고, 데이터 변경 시 캐시된 데이터가 최신 상태를 반영하도록 돕는다.
import org.springframework.cache.annotation.CacheEvict;
import org.springframework.stereotype.Service;

@Service
public class UserService {

    @CacheEvict(value = "users", key = "#userId")
    public void deleteUser(Long userId) {
        // 사용자 삭제 로직
    }
}- deleteUser 메서드가 호출되면 users 캐시에서 해당 userId 키에 해당하는 항목이 삭제된다.

성능 테스트
load test시 사용할 수 있는 아주 간결한 툴!아니 진짜 그 베지터였네ㅋㅋㅋㅋㅋㅋㅋㅋㅋㅋㅋㅋ
GitHub - tsenart/vegeta: HTTP load testing tool and library. It's over 9000!
HTTP load testing tool and library. It's over 9000! - tsenart/vegeta
github.com
대량의 트래픽을 짧게 쏴서 DB만 사용했을 때와, 캐시를 결합해서 사용했을 때 얼마나 차이가 있고, 응답에 실패는 없을지 확인해보도록 하자.
brew install vegetatouch request1.txtGET http://127.0.0.1:8080/nocached-users/1
GET http://127.0.0.1:8080/nocached-users/2
GET http://127.0.0.1:8080/nocached-users/3vegeta attack -timeout=30s -duration=15s -rate=5000/1s -targets=$1 -workers=100 | tee v_results.bin | vegeta report- 타임아웃은 30초, 15초 동안 공격!!을 퍼붓는데, 초당 5000 트래픽 요청을 진행할 것이고, 타겟은 위에서 만든 파일을 넣을 예정이며, 워커는 100개를 만들어서 동작
캐시를 사용하지 않는 API를 호출했을 때 실패율이 높은 것을 알 수 있었음...!


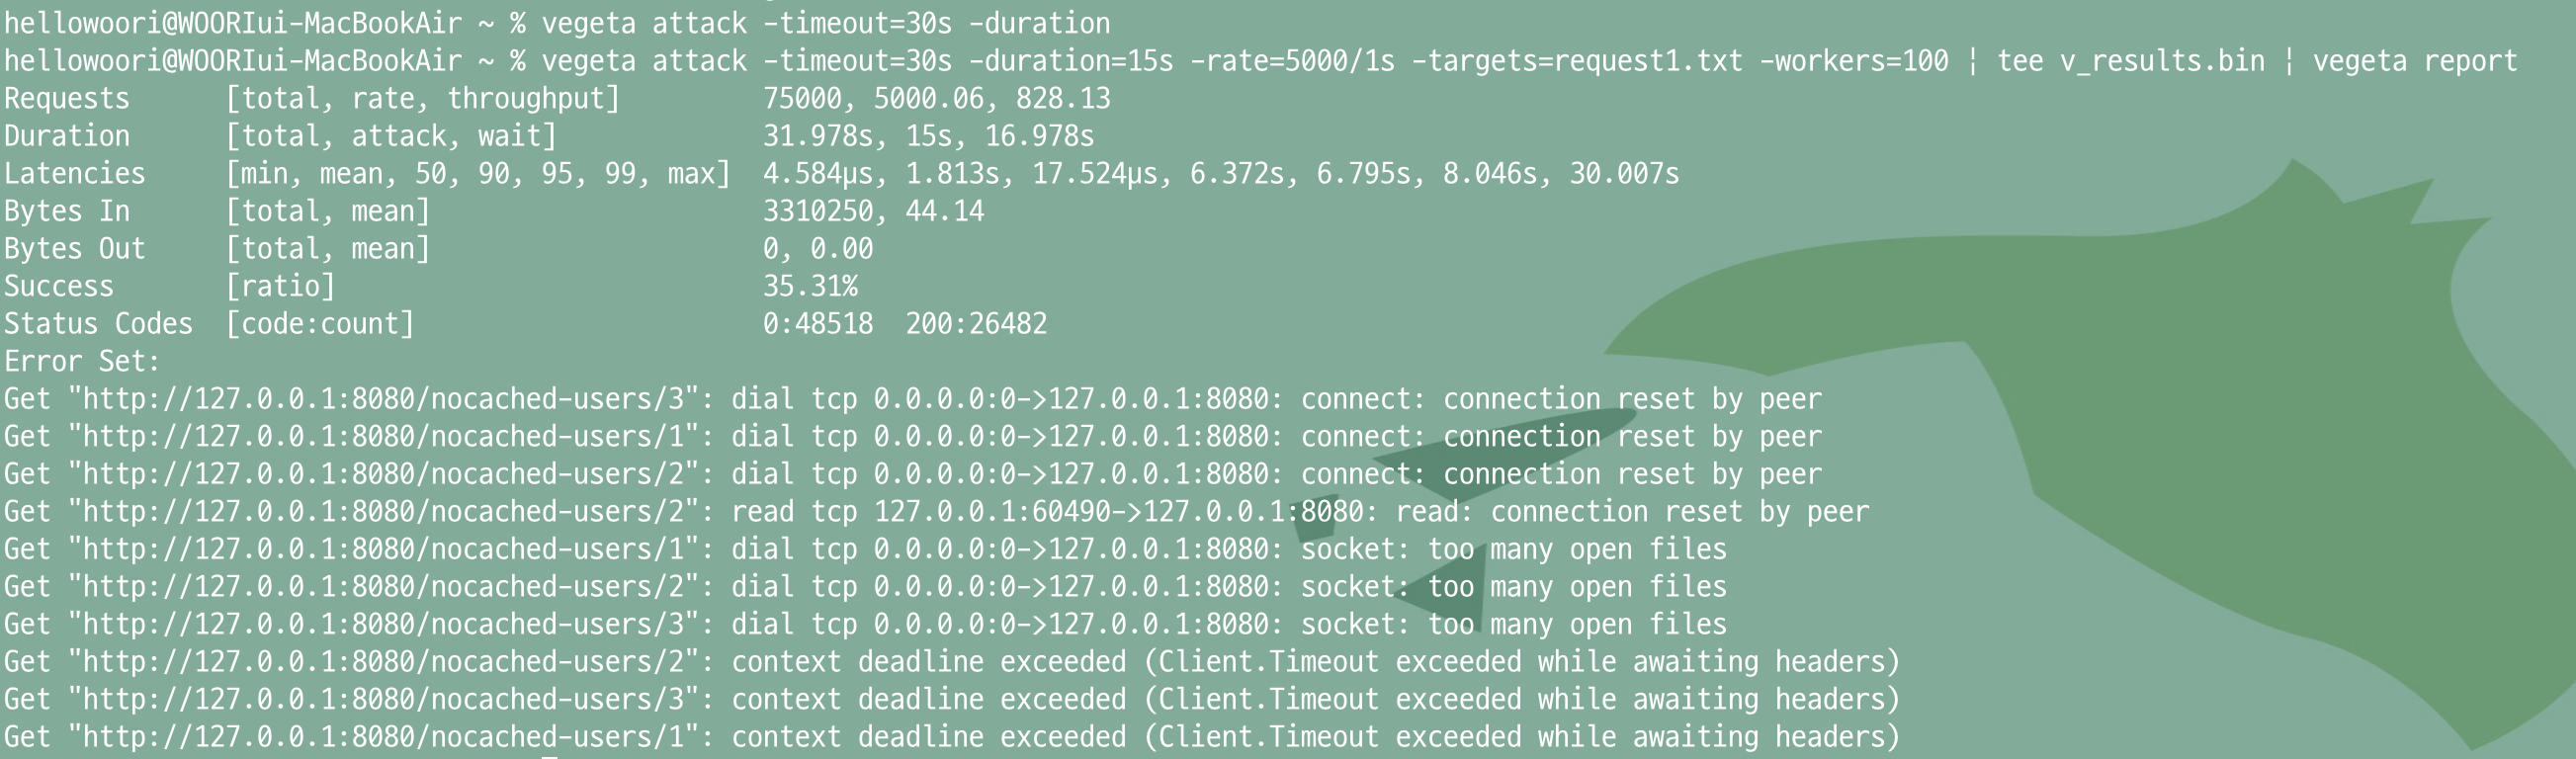
단순히 "OK"만 응답하는 API에서는 성공률이 100%랑 비교했을 때 큰 차이가 있는 것을 알 수 있다.
GET http://127.0.0.1:8080/
GET http://127.0.0.1:8080/
GET http://127.0.0.1:8080/package me.progfrog.cache_study2.controller;
import org.springframework.web.bind.annotation.GetMapping;
import org.springframework.web.bind.annotation.RestController;
@RestController
public class HomeController {
@GetMapping("/")
String home() {
return "OK";
}
}vegeta attack -timeout=30s -duration=15s -rate=5000/1s -targets=request-default.txt -workers=100 | tee v_results.bin | vegeta report
캐시를 도입한다면...!
MySQL CPU가 비교적 안정적이고, 더 많은 트래픽을 처리할 수 있음을 알 수 있다.
GET http://127.0.0.1:8080/cached-users/1
GET http://127.0.0.1:8080/cached-users/2
GET http://127.0.0.1:8080/cached-users/3vegeta attack -timeout=30s -duration=15s -rate=5000/1s -targets=request2.txt -workers=100 | tee v_results.bin | vegeta report